Secure wireless email on Mac OS X
After more than a year of implementing my own measures, I think it’s time to help raise awareness of email security. And in doing so, document the way I use SSH to secure email when I’m on a wireless network. If you’re concerned about strangers having open access to your usernames and passwords, and all the email you send and receive while connected to a public wireless network — whether you use a Mac or not — you’ll want to read this.
![]() After more than a year of implementing my own measures, I think it’s time to help raise awareness of email security. And in doing so, document the way I use SSH to secure email when I’m on a wireless network. If you’re concerned about strangers having open access to your usernames and passwords, and all the email you send and receive while connected to a public wireless network — whether you use a Mac or not — you’ll want to read this.
After more than a year of implementing my own measures, I think it’s time to help raise awareness of email security. And in doing so, document the way I use SSH to secure email when I’m on a wireless network. If you’re concerned about strangers having open access to your usernames and passwords, and all the email you send and receive while connected to a public wireless network — whether you use a Mac or not — you’ll want to read this.
Who’s reading your email?
Know what happens to your usernames, passwords, and personal email messages when you use public wireless networks? Know that this data often travels freely through the air in clear text? And do you know how dead simple it is for anyone else on that same network to intercept your information and use it against you? On the flip side, did you know you can scramble this data to make it completely unintelligible, even if someone else does intercept it?
With SXSW Interactive and several other upcoming conferences looming on the horizon, I’m reminded once again that I’ve promised quite a few people that I’d write out my steps for securing email on the Mac as it passes from my computer over a wireless network.
There are many means to an end when it comes to security. No one solution is the best for everyone. I am, by no means, a security expert. I don’t claim to know all the answers, nor the best means of securing your data and communication. Some of the tips below are Mac-specific, and will only prevent other people on a wireless network from easily sniffing your information. Not all of them may be relevant to you. It shouldn’t take someone longer than 15-30 minutes to configure a Mac, once they understand what needs to be done.
Why should I secure my email?
I’m amazed when I see friends naively checking email wirelessly without using some type of secure connection. They open up their laptop in a public setting, select any available wireless network, and immediately pop open their email client to start sucking down their messages.
Many conferences are now widely known for having open wireless networks available to hundreds of attendees at once. The network may be sanctioned by the conference organizers, or not. Cafes, bookstores, and public libraries offer free or pay-per-use wireless hotspots. The amount of data and personal information traveling freely though the air is at an all-time high.
The majority of these wireless networks are configured with the lowest possible security settings, so that customers can connect to the network as easy and trouble-free as possible. This allows just about anyone with a wireless-capable laptop computer to walk into a cafe, grab a cup of coffee, and start browsing or checking their email immediately.
What you may not realize is how easy these low security settings allow someone else on the same network to spy on the data passing around on that network. Just because you’re the only person who can see your laptop screen, doesn’t necessarily mean you’re the only one who can see the email message you just got from a friend. Just as easily as someone could sit near you in a quiet cafe or library and overhear your entire verbal conversation with another person, so could they “listen in” on all the usernames, passwords, and messages passing to and from your computer. (And everyone else’s computer for that matter.)
The art of interception
How can a stranger “intercept” my personal info?
Easier than you think, if you’re not being careful.
If you’re not doing something to secure your email, your usernames, passwords, and messages are most likely traveling through the air as clear text. Plain, unscrambled, unencrypted, easy-to-read-by-anyone text. Anyone connected to the same network can “sniff” for data passing through the air, then grab and log that data on their computer. All without you even knowing it. You have no idea how much of your digital conversations are being overheard.
Information is traveling to and from your computer in the form of small packets. Each time your computer receives those packets, it reassembles them, and displays the email you received, or the web page you’re trying to view. Utilities called packet sniffers can detect or “sniff” these packets of information flying around on the network, collecting it for analysis. SysAdmins use packet sniffers and network utilities to monitor and troubleshoot their own networks. Now, packet sniffers are widely and freely available, and are easy for anyone to use.
If you’re concerned, you have a reason to be.
The important thing to note is that packet sniffing doesn’t modify the information being sniffed in any way. So you can’t tell whether your information has been seen by anyone else or not. There’s no stamp on the data that says it’s been collected by another machine. There’s no open-envelope icon on your email message to let you know that someone else already read it. Again, it’s like someone listening in on your conversation, but without you knowing they’re doing so.
Another person or machine doesn’t need to be near you to sniff your passing data. As long as you and the sniffer are on the same network, your data can be sniffed.
Easy methods for anyone
So how do you secure your email and keep it private from curious eyes? What does it mean to read my email “securely”?
As mentioned above, there are many means of safeguarding email communication. They each have varying degrees of security and capability. Methods range from access to a trusted VPN, to certain secure web-based email applications (webmail), to allowing connections over SSL, sometimes known as POPS or IMAPS.
If any of the above options are available to you, you should investigate them further before taking any of the steps below. Setting up a connection over SSL is often as easy as checking a box or two in your account preferences, and never needing to think about it again, let alone deal with anything below.
SSH tunnels
If a VPN or POPS/IMAPS isn’t accessible to you, and if you want use of your regular email client rather than using webmail, you may want to look into SSH to protect you when you’re on a wireless network. If you have access to a server that supports SSH, you can create a “tunnel” directly to that server, and pass all your information through the tunnel to the server as encrypted, unintelligible data.
The SSH tunnel acts as a two-way private channel between your computer and the SSH server. Only your computer (the SSH client) and the SSH server can make sense of the encrypted data. Once incoming data safely reaches your computer, it is then safely decrypted, and reassembled for you to see as normal. The opposite happens for outgoing data: the client software on your computer encrypts the data, sends it though the tunnel, then the SSH server decrypts it and passes it along as normal to its intended destination. Once your data is passed on from the SSH server, it’s then traveling unencrypted (unprotected), albeit almost always over a wired network. It’s much easier to sniff your data while it’s traveling through the air on a wireless network — this is the portion that can be protected by using SSH to create a tunnel, bypassing the lack of security with wireless connections.
The process is transparent and seamless to you and to anyone you send email. Even though information sent through an SSH tunnel can still be sniffed by someone else mid-stream, it appears as garbled and unreadable to those outside the tunnel.
SSH tunnels need to be created each time you join a new network, and before you start passing any data back and forth. The tunnel is used for multiple data transfers for as long as you need it. Once you disconnect from the SSH server, the tunnel is “destroyed” and never usable by anyone else.
Passwordless SSH access
If you use your own computer, use it often, and you’re the only one who access it, you may want to set up “passwordless SSH access”. Typically, each time you ssh into a server, the account password needs to be provided manually. However, another means of handling authentication can eliminate the need for a password, simplifying the connection in terms of what you need to do and see.
The entire process of creating public/private keys for passwordless SSH access is described about halfway down on Page 2 of Jason McIntosh’s “Secure Mail Reading on Mac OS X“. It may sound a little tricky on first read. But it’s really not very difficult. Setting up public and private RSA or DSA keys can be as simple as the execution of a few Terminal commands. Alternatively, if you don’t want to do the whole thing in the Terminal, you need the temporary ability to view hidden file locations on your Mac (for editing) and to transfer files to your server.
Once enabled, you’ll be able to SSH into the server from that computer without storing a password, or without typing a password each time you want to connect. I automate as much of this process as possible, so that I use it every single time. If it’s a pain to secure my email every time I want to use it, I’ll eventually stop securing it.
Port forwarding
The process of receiving and sending email needs to be redirected through the SSH tunnel to take advantage of its security. This is done by using port forwarding. Every type of network data transfer uses a certain port, identified by a standard port number. POP mail usually travels over port 110, while IMAP usually uses port 143. Sending mail via SMTP uses port 25. Remaining network services on your computer use other ports.
Typically, port forwarding is set up and controlled though the Terminal with long command-line instructions that intimidate a designer like myself. Fortunately, there’s a GUI tool available to automate the creation of tunnels and custom forwarding of any ports we want to use…
SSH Tunnel Manager
 SSH Tunnel Manager (hereafter, SSHTM) is the convenient connection between SSH and your email client. It’s a FREE Mac OS X utility that helps create SSH tunnels and automatically sets up all the ports that need forwarding. It’s simple to configure, once you know what you’re doing.
The only downside of using SSHTM is the current documentation. It’s written for Version 1 of the software, and its instructions were still a little cryptic to me. I (and the developer) recommend using the latest beta build (2.0b3, as of right now) rather than Version 1. The steps and screen captures below relate to Version 2.0b3 of the software. Other newer or older versions may be slightly different.
Windows users, note: Several options are available for GUI-based SSH tunnel managers. One possibility might be Han-soft’s Internet Secure Tunneling, which appears to do similar things as SSHTM.
SSHTM setup
In SSHTM’s main window (SSH Tunnels) click Configuration to add a new tunnel. The Preferences window opens. Click the [+] button below the tunnel list to configure the first tunnel. Enter a name for this tunnel, your ssh user name, and the server location. The standard port for SSH is 22 — most likely, your server uses port 22 as well.
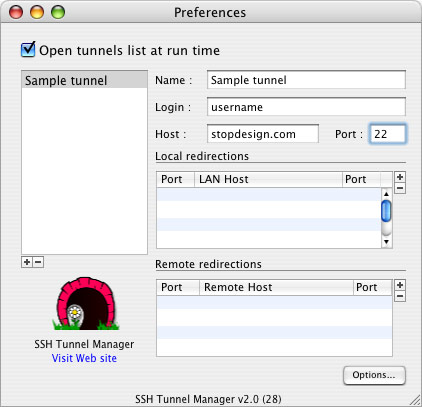
Next, you’ll need the mail host and port number for each server to which you’ll be connecting. For instance, my main mail server is mail.stopdesign.com. If I want POP mail, I’d connect to port 110 on the server. IMAP would use port 143.
You also need to choose a unique local port number to correspond the server’s port number for each connection you want to make. Use a unique local port number for each mail server and its mail protocol. Local port numbers need to be greater than 1023, and shouldn’t conflict with anything else running on your machine.
My system for choosing local port numbers is simple. I take the server’s port number for that protocol (110 for POP) and add a 0 to it for the first POP connection, making the local port number 1100. Since I have more than one POP connection, I iterate that series to 1101, 1102, etc for each additional POP connection. For instance:
| Local port | Mail server | Remote port |
|---|---|---|
| 1100 | mail.stopdesign.com | 110 |
| 1101 | pop.sbcglobal.yahoo.com | 110 |
| 1102 | mail310.pair.com | 110 |
| 1103 | mail.dbowman.com | 110 |
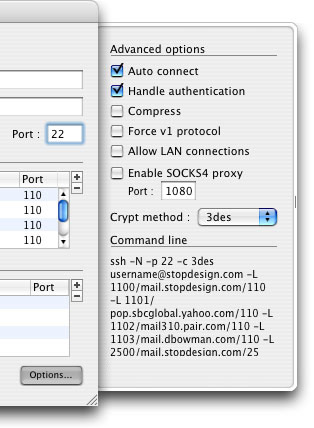
You can also send all outgoing mail through the SSH tunnel if you wish. Remember: outgoing mail usually uses a different server or port number, so you’ll need to configure an extra forward in SSHTM. For outgoing mail (port 25) I add two 0s, using 2500 for the local port number.
Since you want the redirects through the tunnel to happen locally on your computer (before the data leaves your computer) you’ll use Local port forwarding. In the Preferences window, under “Local redirections”, click the [+] button to add a new forward. The local port number you chose for this server/protocol goes first on the left side, then the server/host name, then the server’s port number on the right. Enter as many forwards as you need. My Preferences window looks like this:

The last thing you may want to change is to have the tunnel you just configured automatically connect each time you open SSHTM. Click the Options... button and ensure the “Auto connect” option is checked in the options drawer. Other options for the tunnel are available here, and the command line used to create the tunnel is visible in this drawer:
Close the Preferences window. Once you have one or more tunnels configured, the SSH Tunnels window shows your available tunnels, with a gray start button to the right of each one. Test the configuration by clicking the start button. You’ll see a couple of simple status messages flash below the tunnel name. Hopefully, after a few seconds, the tunnel will be successfully created, and you’ll have a window that looks like this:
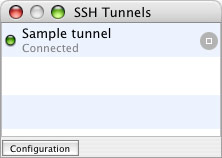
Click the stop button to kill the connection and destroy the tunnel. If you didn’t get the “Connected” status message, recheck your tunnel configuration, or verify that you really do have SSH access to the server you’re using.
Note: If you didn’t select “Auto connect” in the tunnel’s options, you’ll need to click this start button to create the tunnel each time you open SSHTM.
Email client setup
One last step to securing your email. To take advantage of the Local port forwarding of the SSH tunnel, the settings of your email accounts need to be tweaked slightly. These steps are specific to Apple’s Mail application (Version 1.3.9 at the time of this writing). But the same changes should be possible to make in other email clients.
Caution: As with any significant change, it’s always a good idea to back up before proceeding. In this case, backing up your Mail preferences file is a good idea. The preferences file should be located here:
~/Library/Preferences/com.apple.mail.plist
Open Preferences in Mail, and go to Accounts. Under Account Information, change “Incoming Mail Server” to localhost.
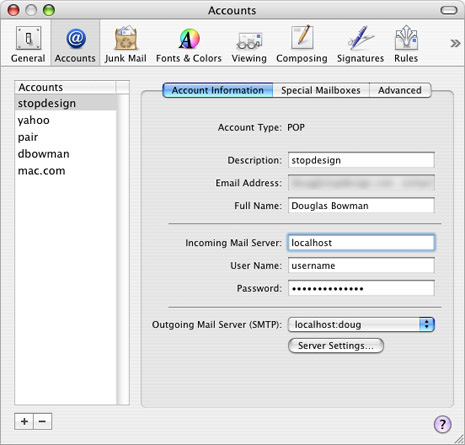
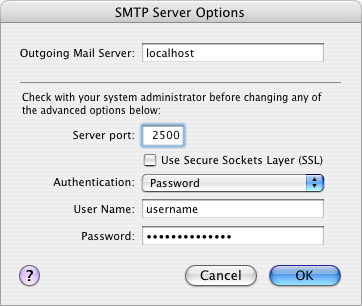
If you’re running outgoing mail through the tunnel, you’ll also want to change the SMTP settings for this account. If localhost already exists as an option in the pull-down menu, select it. Otherwise, click on the Server Settings button under “Outgoing Mail Server (SMTP)”. Change “Outgoing Mail Server” to localhost, and “Server Port” to whatever local port number you chose for outgoing mail. (I used 2500.) If your SMTP server requires some type of authentication, change the settings here to match those requirements. Otherwise, leave “Authentication” set on None.
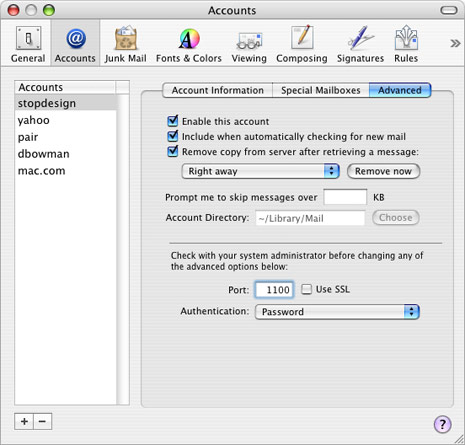
Finally, go to the Advanced tab of the Accounts pane. Change the port number to the local port number you chose for this account’s server/protocol. This number should match up with the number you entered for this server/protocol on the left side of the “Local redirections” section in SSHTM’s Preferences window. (For my first POP connection, I used 1100.)
You’ll need to make those changes for each Mail account you want to run through the SSH tunnel. Save your changes after modifying each account, then quit Mail.
You’re done
Launch SSHTM. Allow your tunnel to automatically connect, or click the start button to manually connect the tunnel. Then launch Mail again. Assuming everything is configured and working correctly, your email should automatically be encrypted, garbled and safe from spying eyes on the same wireless network. All your incoming and outgoing messages will look and read exactly the same to both you and your recipients. You shouldn’t notice any visible differences to your email at all.
This one small extra step of launching SSHTM (allowing the tunnel to be created) is the only extra thing you need to do each time you want to connect and use Mail.
If you ever Command-Tab over to Mail, and see a grayed out “In” box, it might mean that SSHTM somehow disconnected from the server, destroying the tunnel. Usually, your SSH client will automatically disconnect from the tunnel if your computer shuts down or goes to sleep. Brief outages in your wireless connection can also cause a disconnection. To receive or send email again, just go back to SSHTM and create the tunnel again.
If you choose to enable passwordless SSH access, you may want to split up the task of securing your email into two chunks. Set up the public/private keys one day. And continue with the SSHTM portion another day.
That’s it! You’ve protected your email account from wireless sniffing through SSH tunneling and port fowarding. These steps should help keep your email more private than you thought it was. Work for you?