Underline text in Adobe Illustrator
When creating web comps, it’s not uncommon to underline some of the links on the page. Despite the fact that users have been asking how to underline text in Illustrator for several versions now, Adobe somehow manages to exclude this feature in each new release of the software. Here’s how to work around that limitation.
Last week, when I announced the Blogger redesign, I mentioned that I’ve been using Adobe Illustrator much more often to comp my designs, instead of Photoshop. The vector-based Illustrator provides more flexibility in shape rendering, and allows me to create and tweak designs faster than the bitmap editing of Photoshop. Once we’ve honed in on a final design, then I move over to Photoshop for a final polish and pixel-level precision for the site’s images. Just after the Illustrator mention in the Blogger entry, I tossed in this little frustration:
One gripe about using Illustrator for web stuff: after 11 versions, there’s still no easy way to simulate underlined text without manually drawing lines with the pen tool, then moving them every time the text reflows.
Before drawing attention to this one missing feature, I should mention that I love Illustrator. I’ve been working with this vector app since it was dubbed Illustrator 88 — the equivalent of version 1 or 2. I briefly switched over to Freehand (when it was still produced by Aldus) because I could edit and preview artwork at the same time. But Adobe quickly caught up with Aldus, and I switched back. Illustrator is invaluable for working in print design and illustration, and I’ve been finding more and more uses for it when designing for the Web.
When creating web comps, it’s not uncommon to underline some of the links on the page. Perhaps it’s a technical limitation of text rendering. Or perhaps the Illustrator team is afraid that users will want much more control over underlines than capability would permit (stroke weight, offset, etc.) opening up a can of worms if they implemented the ability to underline text. Despite the fact that users have been asking how to underline text in Illustrator for several versions now, Adobe somehow manages to exclude this feature in each new release of the software.
Until now, there was no way to create simple underlined text in Illustrator, other than the method I quoted above. Again, that’s until now. Full credit for discovering a handy trick for creating underlined text in Illustrator (or at least for discovering it, reading about my frustration, then letting me know about it) goes to Phil Oye. He documented his discovery just a little over a month ago. I’ll expand on his explanation here.
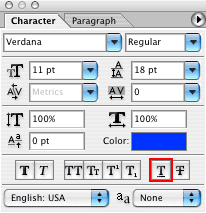
The short version of it is: create the text in Photoshop, then underline it with the underline feature. (Apparently the Photoshop team listened to requests, and managed to figure this out before the Illustrator team.) The underline button sits in the Character palette in the same line as Faux Bold, Faux Italic, All Caps, Strikethrough, etc.
Once underlined, copy the text with Photoshop’s text tool, then paste it into Illustrator. Voilà ! Underlined, editable text in Illustrator. I’m not sure how far back (in versions) the underlined text will transfer over to Illustrator, but it certainly works in CS (v.11).
The rest of the trick is only necessary if repeated instances of underlined text are desired. The description of how to set up a character style gets a little long, but the process is actually very simple once you know what’s involved…
This trick would be a pain the arse if I had to toggle over to Photoshop every time I wanted underlined text in Illustrator. Fortunately for me, Phil also discovered the Character Style palette in Illustrator CS. Once a character style is created for underlined text, the style can be saved to a file in the Presets folder, then imported into other files and reused on any text I desire to be underlined.
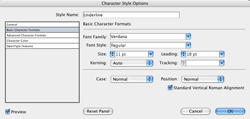
Depending on how many text attributes are set before creating the character style, the style will copy other existing attributes in addition to the underline. For instance, I had already changed my text to Verdana, 11pt, and changed it to blue. So when I selected the text and added a new Character Style, those attributes also got sucked into the style, as seen in the Character Style Options dialogue below.
Having those extra attributes in the style may, or may not, be desirable. For instance, if I knew that I was only going to be using the style for links in web comps, and that all my links would always be Verdana, 11pt, and blue, that character style would be fine, I’d save it out, and call it a day. But if a more generic style is desired, those extra attributes need to be removed from the character style. This way, the character style can be applied to any text, no matter its color, font, size, leading, kerning, etc.
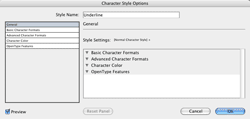
Most of the settings in the Character Style Options dialogue allow their values to be deleted, or the pulldown can be set to (Ignore). However, if any of the checkboxes from any dialogue panels are already checked or unchecked, those attributes will either be set to “Yes” or “No” values. A “Null” value is desired, often represented by a dashed checkbox. The simplest way to nix all the attributes for the style is to hit the “Reset Panel” button for every panel of the Character Style Options dialogue. Since Illustrator provides no control over the underline attribute, the underline will remain a hidden part of the style. The goal for a generic underline character style is to get the General panel to not show any style attributes whatsoever, as shown below:
Again, click for a larger version.
Notice how each of the settings summaries (Basic Character Formats, Advanced Character Formats, Character Color, …) show no additional attributes. In the Character Style Options dialogue, rename the style to something appropriate, like “Underline”. Then save the file containing just the Underline character style in a convenient location. I chose to create a new folder within Illustrator’s “Presets” folder called “Styles”, and then saved the file in that folder. Whenever an underline is needed, use the Character palette to load the saved file containing the pre-configured style, select the text to be underlined, and apply the character style. Done.
One note about this technique needs to be mentioned. As the underline is completely hidden in the character style, Illustrator provides absolutely no control over the actual underline. Normally, not an issue. Except for color. If a text object (or block) exists entirely of underlined text, the underline will adopt the same color as the text. If the text is changed to blue, presumably the underline is intended to be blue too. However, if the underlined text appears with other non-underlined text in the same object, and those two pieces of text are different colors, the underline may adopt the color used for text elsewhere within the same object. So while the text may be blue, the underline may be black, (or whatever color the non-underlined text is) with no apparent way to change the underline color. Less than desirable.
To work around this limitation, I discovered that the underline color usually adopts the color of the first character within that text object. Let’s call this the “point of influence”. When this is the case, a space can be inserted before the first real character, so that the space becomes the point of influence. Set the space to be the same color that the underline (appearing later in that text object) should be. Then apply some small horizontal scale value to the space (1%), so that the space becomes unnoticeable in width to the human eye.
I said the point of influence is “usually” the first character’s color, because I’ve found this to not always be true for longer text blocks. Sometimes I’ve narrowed it down to the 5th character, sometimes the 8th character, but it always seems to be a character from the first line of text. In that case, a space needs to be inserted at the point of influence, and treated the same as above.
By explanation, this isn’t the most graceful solution. But once the character style is set up, underlining text in Illustrator involves little more than clicking a style name. Many thanks to Phil for discovering the solution and pointing me to it.


